Showing posts with label enable. Show all posts
Showing posts with label enable. Show all posts
Wednesday, September 28, 2016
How To Enable Night Mode In Windows 10
How To Enable Night Mode In Windows 10

Windows 10 has now lots of secrets that are hidden from us, but we are still looking for that. As we know, Windows 10 has been released on July 29. So, not a long time is ago now and weve found some awesome secrets that are useful and amazing too. Today, in this article Im gonna show you also a very useful secret of this revolutionary operating system for those users who use their computers late at night.
As you can understand by reading the title and can think what Im gonna talk about in this article. Night mode is really a best and useful feature. but remember its not provided officially in Windows 10. Weve enable this feature own. By enabling this feature, everything will become dark in Windows 10. So due to the darkness, rays of light will become dim and from this way no one will disturb by using your computer.
Read More: How To Disable Night Mode In Windows 10?
How To Enable Night Mode In Windows 10?
So guys heres how can you enable night mode in Windows 10. I tried to explain the steps finely but some steps may be quite difficult for you. Follow them perfectly so that you dont have to face any trouble.To enable night mode, here you need to edit two Windows registry keys. So to edit first key, open your Run by pressing Windows + R buttons then type
regedit in it and press the Enter.
Once youve opened Registry Editor then navigate the following keys.
HKEY_LOCAL_MACHINESOFTWAREMicrosoftWindowsCurrentVersionThemes
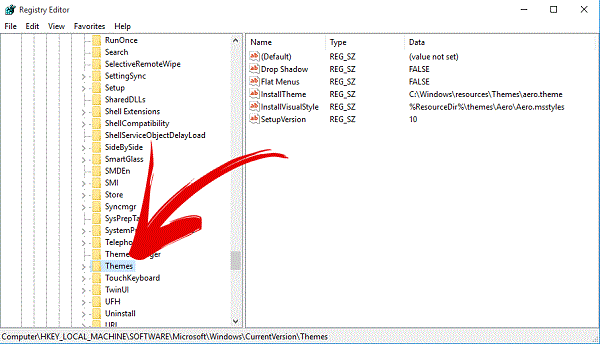
After that, when youve found Theme folder then right click on it and create a new key.

Read More: How To Disable Action Center In Windows 10?Set this key a name as Personalize.

When once the key created then select it and right-click in right pane then select New and DWORD (32-bit) Value.
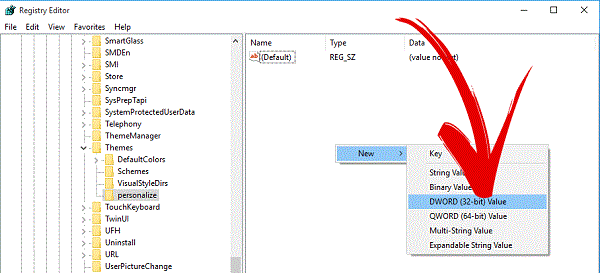
After that action, a DWORD key will create. So also give a name to this value AppsUseLightTheme
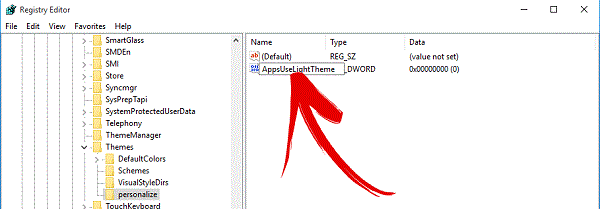
Read More: Windows 10 Personal Assistant (Review)Now your first Registry key has been edited and now you need to edit another registry key. So to do that, again open your Run and type
regedit in it and click on OK.When the Registry Editor opened then navigate the following keys.
HKEY_CURRENT_USERSOFTWAREMicrosoftWindowsCurrentVersionThemespersonalize

When you reached to the Themes folder at once then just click on it. A drop down will open, here search for Personalize folder. In case, if its not there then create it yourself and dont forget to set it as name Personalize. After all, click on Personalize and then right click on right pane and create a new registry key by following this New>DWORD (32-bit) Value.

Read More: New Keyboard Shortcuts Of Windows 10When this key has been created then give it a name AppsUseLightTheme.

Everything has been done. Reboot now your operating system and check. Dark mode has been enabled in your Windows 10. Enjoy it!
Available link for download

Friday, September 2, 2016
What Is God Mode In Windows 7 8 or 8 1 10 And How To Enable It
What Is God Mode In Windows 7 8 or 8 1 10 And How To Enable It

God mode, a hidden secret of Windows operating system. It was introduced first time in Windows 7. After that, its consistently available in Windows 8 or 8.1 and 10. But still yet windows users are not aware from it even I wasnt too. Actually, it works very simple. You can quite imagine from its name "God", means it can do everything. Once you enable God Mode then you can manage Windows control panel in a click. You will be able to customize everything about Windows setting just in one click. Yeah, after that therell no need to go to the different menus or options to customize control panel.
Also Read: How To Disable Night Mode In Windows 10?
The best thing of it, I like the most that it is easy to install and not complicated. Try it once and experience the benefit to use it. Below are the steps to enable, but before that Id like to explain a short definition of God Mode. So heres it.
What Is God Mode?
God Mode is a hidden feature of Windows operating system that is similar to the Control Panel or you can consider it as a brother of Control Panel. In which, all the options of control panel show in a list, as you can see in below image. From this way, you spare your time in opening more options to manage the setting. So, just open the God mode and then do your work in one click.
How To Enable God Mode In Windows 7, 8 or 8.1 & 10?
Instructions to enable it, are same for all Windows wsers. So no matter which operating system youre using now. Im using Windows 7, so if youre a Windows 8 or 8.1 or 10 user then follow the same procedure below. (Note: Windows Xp and Vista users are not able to use the God Mode feature)First of all, stay at your desktop and create a new folder on it.

Also Read: 10 Tips And Tricks That All Windows Users Would Love To Know
Once the folder created then rename it and give a name
GodMode.{ED7BA470-8E54-465E-825C-99712043E01C}
Now God Mode has been created. Simply open it and experience its benefits. Thats it!

Also Read: How To Paste Any Code or Command In Cmd By Using CTRL+V?
Conclusion
God Mode is the best opportunity to spare your time. Because in the God Mode all the options of Control Panel available in a form of list. Thats why, you have no need to find folders and menus to customize Control Panel setting. Hope, this article is helpful for every Windows users. If you think, its really helpful then dont forget to share with others. Share your views about the God Mode via comment below.Available link for download
Sunday, August 21, 2016
How to Enable or Disable Sign in Screen Background Image in Windows 10
How to Enable or Disable Sign in Screen Background Image in Windows 10
Windows 10 has a new sign in screen that is more modern and touch friendly that also uses the Hero wallpaper as the background by default.

In this tutorial we will show you how to enable or disable the sign in screen background image for all users in Windows 10.
Note that you must be signed in as an administrator to be able to enable or disable the sign in screen background image.
So to do that on windows 10 final version you should :
Add and change DWORD value in the registry key below.
HKEY_LOCAL_MACHINESOFTWAREPoliciesMicrosoftWindowsSystem
DisableLogonBackgroundImage DWORD
0 or delete = enable
1 = disable
In this tutorial we will show you how to enable or disable the sign in screen background image for all users in Windows 10.
Note that you must be signed in as an administrator to be able to enable or disable the sign in screen background image.
So to do that on windows 10 final version you should :
Add and change DWORD value in the registry key below.
HKEY_LOCAL_MACHINESOFTWAREPoliciesMicrosoftWindowsSystem
DisableLogonBackgroundImage DWORD
0 or delete = enable
1 = disable
Available link for download
Saturday, August 13, 2016
How to enable Windows Remote Desktop Kaspersky Endpoint Security 8 and 10 Firewall
How to enable Windows Remote Desktop Kaspersky Endpoint Security 8 and 10 Firewall
Kaspersky Endpoint Security:
Settings
Firewall
Network packet rules
Remote Desktop network activity
Edit
Action: Allow
Local ports: 3389 (default)
Address: as you need
OK
Save
Screenshots:


Enable Windows Remote Desktop:
Computer
Computer
Properties
Remote settings
Remote
Remote desktop
Enable as you need


Available link for download
Subscribe to:
Posts (Atom)