Sunday, July 31, 2016
Windows 10 Driver Compatibility Issues How to Resolve
Windows 10 Driver Compatibility Issues How to Resolve
Windows 10 is released and the big day is made, uh? Have you already installed Windows 10? Are you fed up with driver compatibility issues after the upgrade?

Mandatory Automatic Updates on Windows 10 - Benefits and Drawbacks
Have you ever read the EULA when installing Windows 10? The new rule is much different than before and the biggest concern is "automatic updates without any additional notice" which basically indicates mandatory automatic Windows updates regardless if you want them or not.
It cant be denied that there are many benefits of getting Windows updates because you can always keep your computer up to date and benefit from the new features. However, there are inevitable side effects like many users reported:
"Automatic download, especially for drivers is a bad idea. They should be optional. A bad graphics driver can screw your whole week!"
"Please, stop with automatic GPU drivers download in the Windows Update."
Except the driver issues, users are also reporting problems on bluetooth and WiFi connectivity.
"Does anyone know if Bluetooth is working properly...? Only reason I uninstalled Windows 10 Preview was because Bluetooth speaker connection was hit and miss. It works flawlessly on 7"
"Network adapter for WiFi need to be reset on every boot."
There are more reports about the same issues and other such as problems with Intel and AMD, audio, mouse and touchpad drivers.
How to Resolve Driver Issues after Upgrading to Windows 10?
It is never an easy task to solve driver problems especially you are not familiar with computer working and connecting principle. Generally, there are 3 ways to fix driver issues. If you are not good at solving problems by your own, maybe I would introduce you an automatic driver repair tool DriveTheLife, a free and professional driver updater, finder and manager.
It will automatically scan your drivers and identify the ones in problem, missing, outdated, corrupted and then install the right ones with one click. Try it out to see if the driver problem is cleared up.

No Internet after System Win 10 Update?
If your case is that there is no internet connection after the Windows 10 update, you may need to install a special tool called DriveTheLife for Network Card which will download and install the best-matched network driver without internet connection.
Extended Tip
Share Your Computer Internet with Other Devices without Wireless Router
Available link for download
Contoh Soal Sejarah Indonesia Kelas 12
Contoh Soal Sejarah Indonesia Kelas 12
Soal :
1. Apa yang melatar belakangi pemberontakan DI/TII pimpinan Kahar Muzakar ?
2. Sebutkan tuntutan umum dari gerakan separatis di daerah-daerah ?
3. Apa yang melatar belakangi S.M Kartosuwiryo melakukan pembentukan DI/TII
4. Jelaskan keterkaitan antara GAM dengan DI/TII
5. Jelaskan tentang pemberontakan PKI tahun 1948
Jawaban :
1. Munculnya gerakan DI/TII tersebut bermula dari Kahar Muzakar menempatkan laskar-laskar rakyat Sulawesi Selatan ke dalam lingkungan APRIS (Angkatan Perang Republik Indonesia Serikat). Selanjutnya, Kahar Muzakar berkeinginan untuk menjadi pimpinan APRIS di daerah Sulawesi Selatan.
2. Mengoptimalkan potensi dan kekayaan daerah, menuntut otonomi daerah yang seluas-luasnya, dan mengusahakan pertimbangan daerah agar serta dengan perkembangan di Ibu Kota Jakarta.
3. Karena Sekarmaji Marijan Kartosuwiryo ingin mendirikan negara islam di indonesia , sejak perjanjian renville ditandatangani pada tanggal 8 desember 1947 . Pasukan hisbullah dan sabilillah yang dipimpin oleh sm kartosuwiryo. Kemudian karto suwiryo membentuk gerakan darul islam dan seluruh pasukannya dijadikan tentara islam indonesia
4. Hasan Tiro pernah menjadi pengikut Abu Daud dan pembantaian etnis dan ulama Aceh pada masa DI/TII. Kalau dilihat dari latar belakang pemberontakan pun berbeda jauh dengan DI/TII. Abu Daud memperjuangkan penerapan syariat islam di Aceh sedangkan Hasan Tiro menginginkan Aceh yang merdeka dan berdaulat.
5. Pada Tahun 1948 terjadi bentrok anatara pasukan propemerintah RI dan pasukan pro-PKI di Surakarta. Untuk menghentikan pemerintah menunjuk kolonel Gatot Subroto. Akhirnya 17 September 1948 pasukan pro-PKI mundur dari Surakarta. Kemudian 30 September 1948 di Kota Madiun berhasil di kuasai Tni. Muso tertembak dan Amir tertangkap . Bulan Desember operasi dinyatakan selesai.
Available link for download
Cara Menghilangkan Delta Homes di Mozilla Firefox
Cara Menghilangkan Delta Homes di Mozilla Firefox
Cara Menghilangkan Delta Homes di Mozilla Firefox sampai ke akar-akarnya. Karena saya yakin banyak sekali dari kita yang sebel banget dengan malware yang satu ini. Tiba-tiba saat buka Firefox, halaman home Firefox kita diganti dengan halaman milik delta-homes.com. Oleh karena itu, sekarang saya akan membeberkan Cara Menghilangkan Delta Homes di Mozilla Firefox yang sudah saya praktekkan sendiri.
 |
| Penampakan Browser Terinfeksi Delta-homes.com |
Mau tau cara menghilangkan Fast Start dari Mozilla Firefox?
Cara menghilangkan delta-homes.com di Mozilla Firefox
1. Buka "Menu" pada pojok kanan atas, pilih "Options"
2. Pada jendela yang muncul, hapus alamat URL website delta-homes.com yang ada pada isian "Home Page". Hapus saja.
 |
| Sebelum URL delta-homes.com Dihapus |
 |
| Setelah URL delta-homes Dihapus |
Setelah itu, jangan puas dulu. Kita akan basmi delta-homes ini sampai ke akar-akarnya. Oleh karena itu, ikuti langkah selanjutnya untuk Cara Menghilangkan Delta Homes di Mozilla Firefox.
3. Uninstall program-program yang mencurigakan. Pertama-tama, buka "Control Panel". Lalu pilih "Uninstall Program".
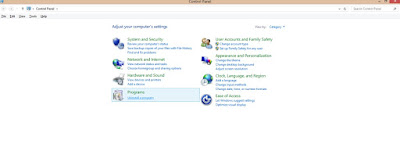
Carilah program-program yang terlihat "aneh", lalu jangan ragu, langsung Uninstall! Jika semua program yang mencurigakan telah dihapus, jangan berbangga hati terlebih dahulu. Kita harus memastikan semuanya telah terhapus. Oleh karena itu, ikuti langkah selanjutnya.
4. Hapuskan link delta-homes.com yang ada pada shortcut browser Mozilla. Pada windows 8, inilah caranya:
- Pada jendela awal/Home Windows 8, langsung ketikkan "firefox", maka akan muncul tampilan sebagai berikut: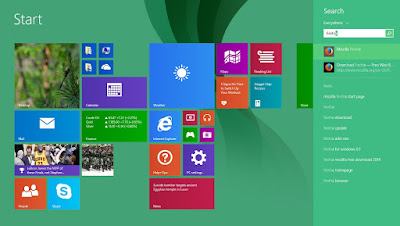
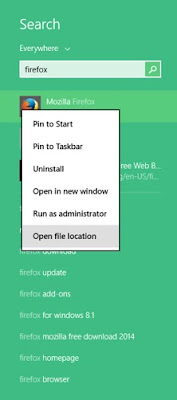
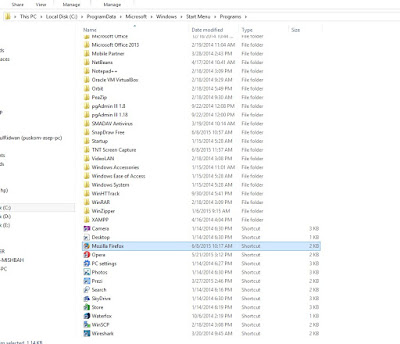
- Lalu klik kanan pada shortcut "Mozilla Firefox", pilih "Open File Location", seperti tampilan berikut:
- Maka setelah keluar tempat shortcut tersebut berada, pilh shortcut "Mozilla Firefox", lalu pilih "Properties".
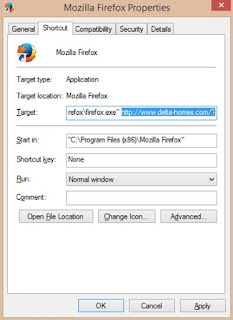
- Setelah itu, kita hapus alamat "delta-homes.com" yang ada pada bagian belakang kolom "target".
Ingat, malware ini sangat cerdas, sehingga dia mampu menaruh alamatnya yang membuat kita secara otomatis akan membuka dan mengaktivkan kembali malware ini setiap kali kita membuka shortcut tersebut. Perhatikan gambar berikut:
Ingat, malware ini sangat cerdas, sehingga dia mampu menaruh alamatnya yang membuat kita secara otomatis akan membuka dan mengaktivkan kembali malware ini setiap kali kita membuka shortcut tersebut. Perhatikan gambar berikut:
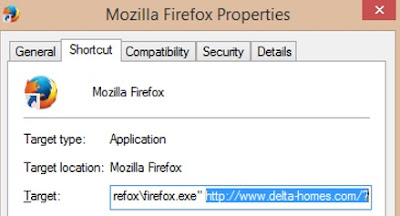
- Setelah tulisan "..firefox.exe", sisanya adalah "http://www.delta-homes.com/?..." hapus itu semua sampai ujung akhir! Karena script itulah yang membuat kita akan selalu membuka homepage delta-homes, sehingga firefox kita akan selalu terganggu.
Setelah kita melakukan seluruh langkah itu, maka delta-homes.com sudah resmi kita hapus sepenuhnya dari broeser mozilla firefox kita! Bagaimana? Apakah kamu masih bermasalah? Dont hesitate to ask, ya!
Kita juga dapat memilih shortcut yang ada pada Desktop, atau semua shortcut Firefox yang ada, lalu klik kanan, pilih "Properties". Lalu lakukan langkah-langkah yang sama dengan yang di atas. Itulah langkah-langkah yang paling efektif menurut saya sebagai Cara Menghilangkan Delta Homes di Mozilla Firefox. Semoga dapat membantu sobat semua, ya!
Beberapa alamat yang mungkin dapat membantu kamu juga diantaranya adalah:
http://mmishbah.blogspot.com/2015/06/cara-menghilangkan-fast-start-dari.html
http://www.malwareclues.com/id/Browser-pembajak/Cara-menghapus-delta-homes.com-Redirect-Virus-dari-Internet-Explorer-20150428.html
http://stop-sopa.appspot.com/tanpavirus.web.id/delta-homes-com/
http://arief-just4fun.blogspot.com/2014/05/cara-menghapus-delta-search-di-new-tab.html
Mau tau cara menghilangkan Fast Start dari Mozilla Firefox?
Available link for download
Mengganti Nama Localhost pada Debian
Mengganti Nama Localhost pada Debian
- Buka file: /etc/hosts
- Tambahkan baris: 127.0.0.1 domain.kusuka.com
- Atur Proxy setting pada browser (Jika anda menggunkan proxy)
- Berhasil
Available link for download
Setting Repositori Kambing untuk Debian
Setting Repositori Kambing untuk Debian

Masuk dulu sebagai root, lalu ketikkan #nano /etc/apt/sources.list
lalu edit file source.list default menjadi seperti berikut:
deb http://kambing.ui.ac.id/debian lenny main non-free contrib
deb-src http://kambing.ui.ac.id/debian lenny main non-free contrib
deb http://kambing.ui.ac.id/debian-volatile lenny/volatile main contrib
deb-src http://kambing.ui.ac.id/debian-volatile lenny/volatile main contrib
deb http://kambing.ui.ac.id/debian-security lenny/updates main non-free contrib
deb-src http://kambing.ui.ac.id/debian-security lenny/updates main non-free contrib
deb http://kambing.ui.ac.id/debian lenny-proposed-updates main non-free contrib
deb-src http://kambing.ui.ac.id/debian lenny-proposed-updates main non-free contrib
Jangan lupa untuk menambahkan tanda "#" pada file yang sebelumnya, untuk menjadikannya komentar.
Available link for download
Tutorial Mengetahui Masalah Perangkat Wireless Access Point
Tutorial Mengetahui Masalah Perangkat Wireless Access Point
Tutorial Mengetahui Masalah Perangkat Wireless Access Point

Tutorial Mengetahui Masalah Perangkat Wireless Access Point - Saat ini sudah banyak perangkat wireless access point yang beredar dengan berbagai merek. Dengan fitur yang ditawarkan dan kemudahan untuk mendapatkan koneksi ke internet tanpa harus menggunakan kabel membuat banyak orang beralih menggunakan perangkat tersebut ( perangkat wireless ). Namun ada juga mengeluhkan kendala teknis yang kadang dihadapinya, seperti : tiba-tiba terputus dari koneksi jaringan wireless, pancaran sinyalnya tidak kurang jauh (coverage), tidak bisa terkoneksi ke jaringan dll.
Tutorial Mengetahui Masalah Perangkat Wireless Access Point - Dalam kesempatan ini saya ingin sharing mengenai beberapa faktor yang menyebabkan anda tidak dapat terkoneksi ke jaringan wireless (sering disebut wi-fi) dan cara melakukan pengecekan sebelum anda memberi ultimatum bahwa perangkat wireless access point tersebut tidak bagus atau rusak.
1. Wi-Fi tidak terdeteksi
Untuk mengetahui penyebabnya lakukan pengecekan sebagai berikut :
- Cek tegangan output adaptor yang mensuplai tegangan ke perangkat wireless access point anda menggunakan multitester. Jika tegangan output tidak sesuai dengan spesifikasi perangkat, maka ganti adapatornya dengan yang baru. Umumnya tegangan output perangakat wireless access point ada yang 5Volt DC dan 12 Volt DC.
source : internet
- Masuk ke pengaturan web interface perangakat wireless access point, pastikan nama SSID (nama untuk wi-fi) tidak di sembunyikan (hide).
- Beberapa perangakat wireless access point disertai tombol ON/OFF wireless, pastikan tombol atau saklar wireless sudah pada posisi ON.
- Pastikan perangkat wireless client (usb wi-fi, laptop wi-fi) sudah dalam keadaan menyala (ON) dan terinstall driver dengan benar atau tidak rusak.
- Apakah di PC/notebook anda menjalankan program anti virus, lakukan pengaturan file exception di anti virus anda untuk mengantisipasi terhadap pemblokiran program autorun perangkat usb wireless adapter anda.
Catatan : Jika semua langkah di atas telah anda lakukan dan belum bisa mendeteksi jaringan wireless, kemungkinan besar modul transmiter perangkat wireless access point anda telah rusak.
2. Wi-fi terdeteksi tapi tidak bisa terkoneksi ke perangkat wireless access point
Untuk mengetahui penyebabnya lakukan pengecekan sebagai berikut :
- Pastikan anda telah memasukkan password wi-fi dengan benar. Adakalanya seseorang sering lupa dengan password wi-finya sendiri dan ketika anda memasukan password yang salah otomatis anda tidak dapat terhubung ke perangkat wireless access point. Hal ini sering terjadi apabila pengguna menggunakan perangkat baru. Jika ingin mengecek password wifi di PC/notebook yaitu klik icon wireless connection, pilih Properties. Pada tab menu Security, klik Show characters. Maka anda bisa mengetahui kembali password wifi anda.
- Mendekatlah ke perangkat saat anda akan melakukan koneksi, jika ternyata dari jarak dekat bisa kemungkinan ada interferensi sinyal dari perangkat wireless access point lainnya.
- Lakukan restart perangkat wireless access point anda dengan cara mencabut adaptor dan menhubungkan kembali ke stop kontak. Hal ini bisa saja terjadi apabila perangkat tersebut overload atau terlalu banyak pengguna yang terhubung ke wireless access point, sedangkan bandwith internet yang di share kurang memadai.
- Lakukan restart PC/notebook anda dan melakukan koneksi ke perangkat wireless access point lainnya. Jika ke perangkat lain bisa, periksa versi firmware dan lakukan upgrade firmware untuk memperbaiki kinerja perangkat wireless access point anda.
- Periksa kembali apakah di perangkat wireless access point anda mengaktifkan fungsi mac address filter. Jika ya, daftarkan mac address perangkat baru yang akan anda gunakan.
3. Bisa terkoneksi dengan wi-fi tapi tidak bisa browsing internet
Untuk mengetahui penyebabnya lakukan pengecekan sebagai berikut :
- Pastikan pembayaran kepada jasa layanan internet anda belum jatuh tempo (melebihi quota), sebab tanpa anda sadari koneksi internet anda akan diputus tanpa pemberitahuan.
- Cek apakah pengaturan dan pemilihan tipe koneksi ke ISP di perangkat wireless access point sudah. Hubungi operator atau teknisi yang berkompeten dalam hal tersebut.
- Apakah fungsi DHCP server di perangkat wireless access point aktif ? jika ya, maka wireless connetion anda harus diatur obtain baca di sini. Jika tidak, maka wireless connetion anda harus diatur secara manual baca di sini
- Lakukan pembaharuan ip address dengan perintah command prompt baca tutorialnya di sini
- Jika anda tidak dapat melakukan browsing ke website tertentu saja, kemungkinan hal ini dikarenakan adanya pemblokiran URL yang dilakukan oleh ISP. Baca artikel mengenai nawala project untuk mewujudkan internet sehat di sini
- See more at: Arul Ajeh
Available link for download
Canon PIXMA MG3120 Driver Download For Windows 10 And Mac OS X
Canon PIXMA MG3120 Driver Download For Windows 10 And Mac OS X
The PIXMA MG3120 wireless Inkjet snapshot All-In-One delivers top notch first-class, versatility, and ease of use. Constructed-in Wi-Fi®1 technological know-how allows for you to without difficulty print and scan wirelessly very nearly anyplace around your apartment. Print attractive, borderless2 pix at home up to eight.5" x eleven" size with a maximum print colour resolution of 4800 x 1200 dpi3 and the heralded best ink cartridges.

Download Drivers For Home Windows
- MG3100 series MP Driver Ver. 1.01 Download
- MG3100 series XPS Printer Driver Ver. 5.56a Download
- My Image Garden Ver.3.3.0 Download
- Quick Menu v.2.6.1 Download
- Easy-WebPrint EX Ver. 1.6.0 Download
- Easy-PhotoPrint EX Ver.4.5.0 Download
- My Printer Ver.3.3.0 Download
- MP Navigator EX Ver. 5.0.2 Download
- AirPrint Firmware Updater (Mac) for MG3100 series Ver.1.1a Download
- AirPrint Firmware Updater (Windows) for MG3100 series Ver.1.0 Download
Download Drivers For Mac OS X
- MG3100 series Scanner Driver Ver.18.0.1b Download
- MP Navigator EX Ver. 5.0.3 Download
- MG3100 series CUPS Printer Driver Ver. 11.7.1.0 Download
- ICA Driver Ver. 4.0.0 Download
- Quick Menu Ver.2.6.1 Download
- Easy-PhotoPrint EX Ver. 4.6.0 Download
- My Image Garden Ver.3.2.0 Download
- Canon IJ Network Tool v. 4.6.1 Download
- AirPrint Firmware Updater (Mac) for MG3100 series Ver.1.1a Download
- AirPrint Firmware Updater (Windows) for MG3100 series Ver.1.0 Download
The best way to set up for windows
(1) download file driver on above, (2) Plug the USB cable to a pc or desktop, (three) open your downloaded driver file and double click on or open, (4) follow the steps that appear for the period of set up, (5) When the installation is complete then restart your pc, and (6) Finishes and your printer.
The best way to install for Mac OS X
(1) download the driving force above. Prefer the place where the documents are saved/saved, investigate on laptop settings. (2) Double click on downloaded driver file and mount it on Disk photograph. (three) Double click mounted on Disk photo. (4) Double click on packaged driver file in folder. Installation will begins mechanically.
Available link for download
Download Internet Download Manager
Download Internet Download Manager
Jaman Sekarang Masih Saja Download Dengan Kecepatan Standart ?
Udah Gak Zaman Bro, Mending Kita Pake Internet Download Manager Ajah YUk..
Nih Link Nya Tinggal Download Ajah..
Download Internet Download Manager < = = = Download Klik Link
Available link for download
HP Laserjet CP2025dn Driver For Windows And Mac
HP Laserjet CP2025dn Driver For Windows And Mac
Download HP Color Laserjet CP2025dn Driver And Software PCL 6, PCL 5 For Windows 8, Windows 7 And Mac. This printer delivers maximum print speeds up to 21 pages per minute and lets you print black-and-white documents for the same cost as using a mono laser printer.
hp4driver.com provides full feature driver and software for HP Laserjet CP2025. Select the driver that compatible with your operating system.

Installation Guide
- When the download is complete and you are ready to install the files, click Open Folder , and then click the downloaded file. The file name ends in .exe.
- You can accept the default location to save the files. Click Next, and then wait while the installer extracts the files to prepare for installation.
- When the Install Wizard starts, follow the on-screen instructions to install the software.
- Open Control Panel then click Uninstall a Program Double click on the printer you want to unistall, and then click yes
- When the uninstall wizard end, click finish
- Windows 8.1 32 & 64 bit
- Windows 8 32 & 64 bit
- Windows 7 32 & 64 bit
- Windows XP 32 & 64 bit
- Windows Vista 32 & 64 bit
- Manufacture : HP
- Hardware : HP Color Laserjet CP2025
- Software name : HP Universal Print Driver for Windows PCL6 (32-bit)
- File Name : upd-pcl6-x32-6.0.0.18849.exe
- Version : 6.0.0.18849
- Released: 11 Dec 2014
- File Size : 16.6 Mb
- Download PCL 6 Windows 32 bit
- Download PCL 5 Windows 32 bit
- Download HP Universal Print Driver for Windows PostScript (32-bit)
- Manufacture : HP
- Hardware : HP Color Laserjet CP2025
- Software name : HP Universal Print Driver for Windows PCL6 (64-bit)
- File Name : upd-pcl6-x64-6.0.0.18849.exe
- Version : 6.0.0.18849
- Released: 11 Dec 2014
- File Size : 18.4 Mb
- Download PCL 6 Windows 64 bit
- Download PCL 5 Windows 64 bit
- Download HP Universal Print Driver for Windows PostScript (64-bit)
- Mac OS X Mavericks v10.9
- Mac OS X Mountain Lion v10.8.5
- Mac OS X Lion v10.7
- Mac OS X Snow Leopard v.10.6.8
- Mac OS X Leopard v10.5.8
- Manufacture : HP
- Hardware : HP Color Laserjet CP2025
- Software Name : HP Color LaserJet Firmware Update Utility
- File Name : CP2020_Series_FW_Update-20140702.dmg
- Version : 20140702
- Released : 11 Aug 2014
- File Size : 39 Mb
- Download
Available link for download
Asus P4S800 MX SE driver vs Windows 7 32 bit
Asus P4S800 MX SE driver vs Windows 7 32 bit
It was interesting.
Very old motherboard (Asus P4S800-MX SE -10 years old), but Windows 7 didnt recognize the LAN and the Audio device.
But with Windows XP drivers (you can download from ASUS website) works.
Modern operating system with old drivers...and it works:)
Available link for download
Asus Drivers Free All in one Download for Windows 10 8 7 XP Vista
Asus Drivers Free All in one Download for Windows 10 8 7 XP Vista
 |
| Asus Drivers |
Having problems with your Asus Computer? Worrying about there being outdated drivers on your ASUS laptop/notebook/desktop?
If you have computer hardware problems, it is most likely that there is something wrong with your device driver. For example, missing or corrupted will ruin your computer performance, out of date driver will slow down your computer response. So it is highly recommended to check and update your Asus drivers regularly in order to avoid unnecessary trouble.
How to Download Asus Driver Updates?
Since latest driver can prevent device conflict issues, improve computer stability and performance, driver updates are always recommended for all Windows 10, Windows 8, 7, XP and Vista users, both 32bit and 64bit.
Asus drivers can be manually download. Just go to Asus official site and download the latest drivers. All drivers downloading should be free of charge. Alternatively, you can use a free driver update tool DriveTheLife to check your whole drivers, identify the outdated ones and find the latest for your computer. All work is done with one click for totally free.
 |
| DriveTheLife-Automatic Driver Scan |
Once you have DriveTheLife installed and launched, it will start an automatic scan of all the drivers. Missing/corrupted, outdated and not backed up drivers will be listed. Just do the operations (update, repair, backup, restore or uninstall) on your own needs. All these operations can be done manually, but DriveTheLife will save your time and efforts.
Best Asus Laptops Recommended in 2015 by LaptopMag (Part of Toms Guide)
Asus Zenbook UX305
Asus EeeBook X205TA
Asus Transformer Book T300 Chi Blurb (Full-HD 2015)
Asus Transformer Book T200
Asus G751JY
Asus ZenBook NX500
Common and Major Asus Drivers
Graphic drivers
Sound card drivers
Network card drivers
Motherboard drivers
Bios drivers
Keyboard and mouse drivers
Android USB drivers
Digital camera webcam camcorder
Media player drivers
Joystick, Gamepad & Wheels drivers
Firmware drivers
Bluetooth drivers
And so on.
All can be downloaded from here: Free Asus Drivers Download
Read more about updating computer drivers, please read this post: 3 Ways to Update Drivers for Windows 10/8/7/XP/Vista.
Available link for download
Jika Google Chrome Kamu Eror Reset Aja!
Jika Google Chrome Kamu Eror Reset Aja!
| Google Chrome |
Cara reset Google Chrome dengan mudah tidaklah begitu sulit. Yang terpenting kita tahu mengapa kita harus mereset Google Chrome. Serta konsekuensi apa yang kita dapat setelah mereset Google Chrome. Tanpa berbasa-basi, cara reset Google Chrome dengan mudah adalah sebagai berikut:
Cara Reset Google Chrome dengan Mudah
1. Buka Google Chrome
2. Pilih "Menu" pada pojok kanan atas browser, kemudian pilih "Setting"
 |
| Setting |
3. Pilih "Show Advance Setting"
 |
| Show Advance Setting |
Kalau layar monitor Anda kecil, coba scroll bar ke bawah dahulu, ya. Nanti menu "Shwo Advance Setting" akan muncul.
4. Pilih "Reset Setting"
 |
| Reset Setting |
Pilihan ini biasanya juga terletak pada posisi yang paling bawah. Jadi jangan lupa scroll ke bawah dulu ya.
5. Pilih "Reset"
 |
| Reset |
Pada jendela yang muncul, pilih "Reset". Kita tunggu sebentar, maka proses reset Google Chrome sudah selesai.
Demikianlah proses inti dalam cara reset google chrome dengan mudah. Bagaimana? benar-benar mudah, bukan? Silakan dicoba, dan jika mengalami kesulitan, silakan hubungi saya.
Penyebab Perlunya Reset Google Chrome
Setelah mengetahui cara reset Google Chrome dengan mudah, sekarang kita akan memahami penyebab perlunya kita melakukan reset tersebut. Biasanya, kita melakukan reset Google Chrome disebabkan karena:
- Google Chrome sudah terinfeksi malware (seperti Fast Start, Delta-Homes, dll)
- Google Chrome sudah terlalu banyak extentions
- Performa Google Chrome sudah menurun
Jika penyebab-penyebab di atas muncul, maka kita memerlukan cara reset Google Chrome dengan mudah. Namun, sebelum melakukan langkah-langkah reset seperti yang disebutkan di atas, ada beberapa konsekuensi atau akibat yang akan kita terima jika kita melakukan reset Google Chrome. Akibat-akibat tersebut diantaranya adalah:
Akibat Reset Google Chrome
- Semua extension yang pernah kita install akan hilang
- Semua settingan browser kita akan hilang dan kembali le default, termasuk settingan home page, ip address, proxy, dsb
Setelah mengetahui alasan dan juga akibat yang kita terima dengan reset Google Chrome, maka kita dapat menimbang-nimbang dengan lebih baik dan tepat, apakah kita akan benar-benar melakukan reset pada Google Chrome. Paling tidak segala tindakan kita lakukan dengan sadar dan bukan sekedar ikut-ikutan saja.
Demikianlah tulisan tentang cara reset Google Chrome dengan mudah. Semoga tulisan tentang cara reset Google Chrome dengan mudah ini dapat memberikan solusi kepada kawan-kawan semua dalam menghadapi masalah pada browsernya! Kritik dan saran kami terima dengan baik.
Available link for download
Cara Backup File Registry Windows
Cara Backup File Registry Windows
Apakah kamu bingung bagaimana cara backup file registry windows. Nah pada kesempatan kali ini, akan membahas sedikit mengenai cara mudah backup file registry. Kenapa harus dibackup? karena kadang saat kamu mengedit file registry pada registry editor, kemudian error, akan ada perubahan yang sulit kamu kembalikan. Maka dari itu perlunya untuk membuat backup file registry agar mudah mengembalikan registry pada keadaan semula. Untuk membuat backup file registry berikut ini langkah - langkahnya :
 |
| Registry |
Pertama, pastikan kamu sudah masuk ke registry editor. Jika belum tahu caranya , kamu bisa baca pada "Bagaimana Membuka File Registry Windows 10". Setelah kamu ada di registry editor klik file lalu pilih export.
 |
| Export file registry |
Akan muncul kotak penyimpanan . Pilih tempat dimana kamu ingin menyimpan backup file registry milikmu. Secara default akan tersimpan di Document . Untuk ekstensi defaultnya adalah (.reg). Jika sudah klik Save. Maka file registry sudah terbackup (aman) .
 |
| Save file registry |
Nah itulah cara mudah untuk backup file registry dari windows 10. Lalu bagaimana cara Restore (mengembalikan) file registry pada kondisi awal. Caranya hampir sama seperti cara di atas. Untuk me-restore caranya dengan pilih File - Import - Pilih file registry backup yang kamu buat tadi. Atau dengan cara lain, yakni cukup dengan double klik ( klik dua kali) pada file hasil backup tadi maka secara otomatis file registry akan ter-restore (dikembalikan) - Syaratnya saat kamu eksekusi file ini dengan level administrator.
Mungkin sekian dulu tutorial singkat cara backup dan restore file registry pada kesempatan kali ini. Semoga bermanfaat dan bisa membantu kamu untuk backup file registry. SALAM WINDOTEN.
Available link for download
Cara Memperbaiki Error a disk read error occurred Menurut Teknisi Komputer
Cara Memperbaiki Error a disk read error occurred Menurut Teknisi Komputer
 |
| Cara Memperbaiki Error "a disk error occurred" Menurut Teknisi Komputer |
Untuk keselamatan Komputer anda, saya harap baca dengan teliti "Cara Memperbaiki "a disk read error occurred" menurut Teknisi Komputer" dan ikuti setiap langkahnya agar tidak ada yang terlewatkan..
Awalnya kompi saya juga aman-aman saja, dan kemudian saya liat di layar kompi muncul error "a disk error occurred" itu.
Loh ko bisa gini,? kenapa ini ya ?
Jangan menyerah dulu sebelum mencari solusinya, kebanyakan ketika tidak mau sulit langsung intal ulang komputernya. Sayang sama data anda..
Kemudian saya googling dan membaca dari banyak sumber dan berhasil cara mengatasi a disk read error occurred . Di artikel ini saya rangkum cara yang sukses yang saya pernah coba praktekan..
Metode pertama:
Kita cek dari segi hardware nya,
Silahkan dicek kabel hardisk anda, Mungkin kabel data dari motherboard ke harddisk kendor atau terjadi kerusakan, silahkan coba lepas dan pasang kembali. Kalau masih belum bisa coba digantikan dengan kabel baru.
Tidak hanya kabel hardisk saja yang kita cek, tapi coba lepaskan semu kabel yang nyambung ke komputer/laptop anda kemudian bersihkan semua komponen dari debu dan lain-lain.
Dengan cara itu banyak yang masalah "a disk error occurred" bisa teratasi.
Jika belum dapat memperbaiki error "a disk error accurred", coba cara berikutnya.
Cara lain untuk mereset BIOS menjadi default adalah dengan melepas baterai CMOS yang ada di motherboard. caranya yaitu dengan mencabut kabel power, lalu buka casing dan cari lokasi baterai CMOS yang ada di motherboard, setelah ketemu, kamu angkat baterai CMOS tersebut.

Metode kedua:
Kemudian kita cek Bagian Softwarenya,
Resetting / Updating BIOS
Resetting / Updating BIOS
Oke, solusi yang cukup sederhana ini rupanya memberikan hasil yang cukup baik dalam mengatasi masalah "a disk read error occurred press ctrl+alt+del to restart"

Available link for download
HP Deskjet 2542 Driver Download Mac Windows
HP Deskjet 2542 Driver Download Mac Windows
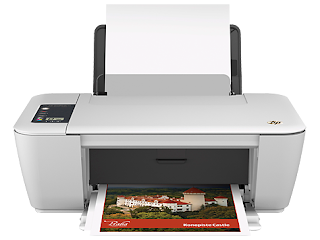
Download HP Deskjet 2542 Driver for windows 10, windows 8, windows 7 and mac. This printer allow you to print, scan and copy crisp photos and document. HP Deskjet 2542 delivers maximum print speed for black up to 20 ppm and color up to 16 ppm.
You can print quickly from your iPhone, iPad and iPod Touch.Print and share with notebooks or PCs on an existing wireless network, using the freedom of built-in wireless.
hp4driver,com provides full feature driver and software for hp deskjet 2542. Select the driver that compatible with your operating system.
Installation Guide
- When the download is complete and you are ready to install the files, click Open Folder , and then click the downloaded file. The file name ends in .exe.
- You can accept the default location to save the files. Click Next, and then wait while the installer extracts the files to prepare for installation.
- When the Install Wizard starts, follow the on-screen instructions to install the software.
- Open Control Panel then click Unistall a Program Doubleclick on the printer you want to unistall, and then click yes
- When the uninstall wizard end, click finish
- Windows 10 32 & 64 bit
- Windows 8.1 32 & 64 bit
- Windows 8 32 & 64 bit
- Windows 7 32 & 64 bit
- Windows XP 32 & 64 bit
- Windows Vista 32 & 64 bit
- Manufacture : HP
- Hardware : HP Deskjet 2542
- Software Name : HP Deskjet Full Feature Software and Drivers
- Version : 32.2
- Released: 2015-12-06
- File Size : 102.0 Mb
- Download
- Mac OS X El Capitan v10.11
- Mac OS X Yosemite v10.10
- Mac OS X Mavericks v10.9
- Mac OS X Mountain Lion v10.8.5
- Mac OS X Lion v10.7
- Mac OS X Snow Leopard v.10.6.8
- Mac OS X Leopard v10.5.8
- Manufacture : HP
- Hardware : HP Deskjet 2542
- Software Name : HP Deskjet Full Feature Software and Drivers
- File Name : HP-Deskjet-2540-series_v12.34.0.dmg
- Version :2.4.0.125
- Released : 2016-07-17
- File Size : 5.4 Mb
- Download
Available link for download
Cara memperbaiki Atibtmon exe Runtime Error in Windows 10 SOLVED
Cara memperbaiki Atibtmon exe Runtime Error in Windows 10 SOLVED
Windows 10 adalah sistem operasi baru, tetapi masih memiliki beberapa bug tua. Salah satu bug tua hadir di Windows 8 dan telah berhasil menemukan jalan dan pindah ke Windows 10 juga. Jika Anda mengalami atibtmon.exe runtime error pada Windows 10 teruskan membaca untuk melihat apakah solusi ini bekerja untuk Anda.
Pertama mari kita menjelaskan apa yang atibtmon.exe lakukan. Program kecil ini dirancang untuk beralih ke modus hemat daya ketika Anda mencabut laptop Anda, dan itu dirancang untuk bekerja dengan kartu grafis ATI.
Adapun fitur hemat daya yang aplikasi ini melakukannya dengan meredupkan kecerahan layar laptop Anda. Banyak pengguna telah melaporkan bahwa mereka mendapatkan Runtime Error yang mengatakan bahwa atibtmon.exe telah meminta Runtime untuk mengakhiri dalam cara yang tidak biasa, dan menurut pengguna masalah ini terjadi ketika mereka memutuskan kabel listrik AC mereka. Ini bukan masalah besar, tapi itu pasti mengganggu, jadi mari kita lihat bagaimana kita bisa memperbaiki masalah ini.
Untuk memperbaiki masalah ini perlu Anda lakukan hal berikut:
Pertama mari kita menjelaskan apa yang atibtmon.exe lakukan. Program kecil ini dirancang untuk beralih ke modus hemat daya ketika Anda mencabut laptop Anda, dan itu dirancang untuk bekerja dengan kartu grafis ATI.
 |
| Atibtmon.exe Runtime Error in Windows 10 |
Adapun fitur hemat daya yang aplikasi ini melakukannya dengan meredupkan kecerahan layar laptop Anda. Banyak pengguna telah melaporkan bahwa mereka mendapatkan Runtime Error yang mengatakan bahwa atibtmon.exe telah meminta Runtime untuk mengakhiri dalam cara yang tidak biasa, dan menurut pengguna masalah ini terjadi ketika mereka memutuskan kabel listrik AC mereka. Ini bukan masalah besar, tapi itu pasti mengganggu, jadi mari kita lihat bagaimana kita bisa memperbaiki masalah ini.
Bagaimana Fix Runtime Error Atibtmon.exe pada Windows 10
Solusi 1 - Nonaktifkan Vari-terang di Catalyst Control Center
Untuk memperbaiki masalah ini perlu Anda lakukan hal berikut:
- Open Catalyst Control Center.
- Go to Power/PowerPlay.
- Uncheck the Enable Vari-Bright(tm).
- Click Apply, and this issue should be fixed.
Solution 2 – Rename / delete atibtmon.exe
Jika Anda tidak memiliki Catalyst Control Center, kami sangat menyarankan Anda untuk menginstalnya sebelum mencoba solusi ini. Coba solusi ini hanya jika tidak dapat menginstal Catalyst Control Center untuk beberapa alasan, atau jika solusi sebelumnya tidak bekerja.
Untuk melakukan ini, Anda akan perlu untuk menemukan atibtmon.exe. File ini terletak di direktori Windows Anda, tetapi jika tidak ada itu mungkin terletak di Windows System32. Bila Anda menemukan atibtmon.exe, klik kanan, dan pilih Rename. Mengganti nama ke _atibtmon.exe misalnya. Ini akan "menghapus" file ini dari sistem anda. Kemudian hanya me-restart komputer Anda dan masalah ini harus diselesaikan. Sekali lagi, kami menyarankan Anda bahwa Anda mencoba Solusi 1 pertama, karena mengubah file sistem kadang-kadang dapat memiliki konsekuensi .
Saya berharap solusi ini membantu Anda dengan memecahkan kesalahan runtime ini. Jika Anda memiliki komentar atau pertanyaan, atau Anda mungkin tahu beberapa solusi lain untuk masalah ini Juga, jika Anda memiliki masalah lain yang berkaitan dengan Windows 10, Anda dapat mencari solusi dalam bagian Fix Windows 10 kami.
Available link for download
Sony VAIO VGN TZ step by step installation of all drivers for Windows 7 Windows 8 For proper operation of all keys and devices
Sony VAIO VGN TZ step by step installation of all drivers for Windows 7 Windows 8 For proper operation of all keys and devices
TZ is a class ultraportables class Hi-End. Typically, these laptops are targeted either women or the businessmen who spend a lot of time in traveling and business trips. The main characteristic of this class of laptops are small and lightweight.
And all the other parameters of the laptop, for example, the configuration or ergonomics, formed from the point of view of preservation of minimal size and weight.

Iron:
Platform Intel Centrino Duo, Chipset Mobile Intel 945PM Express
The Intel Core 2 Duo U7500 (TZ2RMN / N) with a clock speed of 1.06 GHz or Intel Core 2 Duo U7600 processor with a clock speed of 1.2 GHz, FSB 533 MHz and 2048 KB L2 cache
Memory 1024 MB DDR-II 667 Nanya (TZ2RMN / N) , expandable to 2 GB.
Graphics Intel Graphics Media Accelerator 950 c 256 MB
HDD Toshiba MK1011 GAH volume of 100 GB, Interface Ultra 4200 rev / min
media :
Matshita DVD-RAM UJ-852S multi-format , buffer size 2MB , USB interface
Display LCD X-black LED technology Diagonal Size (inches ) - 11.1 , format resolution - 1366x768
Audio Realtek ALC262 @ Intel 82801GBM ICH7-M - High Definition Audio Controller,
A slot for memory cards such as Memory Stick Duo, Memory Stick PRO Duo and SD
WEB 0.3 megapixel camera . 320x240
interfaces :
Wi-Fi (WLAN 802.11b / g), Built-in Bluetooth ( Version ) 2.0 + EDR
Network Ethernet 10Base-T/100Base-TX/1000Base-T
4 Pin i.LINK (IEEE1394), Express card 34mm , 2x USB 2.0, VGA, RJ- 11, RJ- 45
Features:
The fingerprint scanner
Protect your hard drive shock G-sensor electronic protection HDD shock
Dimensions in mm 277h198 , 2x22 ,5 -29 , 8
Weight 1.19
You should know that you need to be patient and spend a lot of time for driver installation and configuration of this laptop ! To successfully install and guaranteed work Fn buttons and getting the maximum duration of the work required to comply with strict sequence of installing the drivers and utilities are already noticeable .
I warn you in advance that when it went on sale a laptop on board stood OS Windows VISTA. In principle drivers for Windows Vista compatible at 90 % with the operating system Windows 7.
1. Motherboard - Driver motherboard.
- Intel PCI IDE Controller
2 . Audio driver audikarty .
- Realtek High Definition Audio Driver
3 . Sony HDD Protection Filter Driver driver hard disk controller .
- Sony HDD Protection Filter Driver
4 . VIDEO Intel Graphics Media Accelerator 950 video card driver .
PCI VEN_8086 & DEV_27A2 & SUBSYS_8215104D
5 . Bluetooth driver bluetooth.
- Broadcom Bluetooth L2CAP Driver Installation
% BTWL2CAP.DeviceDesc% = BTWL2CAPST, BTHENUM {6E0C8F4C-D928- 4852 -B6B2-F0F0E0D126FA}
6. LAN Network Card
- Ethernet Marvell Yukon Ethernet Controller
PCI VEN_1148 & DEV_4320 & SUBSYS_29161259
PCI VEN_1148 & DEV_9E00 & SUBSYS_92001148
7. Card Reader card reader standard Memory Stick and SD. Potrebudetsya manual installation via Device Manager .
- MS RICOH SD / MM Card and Memory Stick driver PCI VEN_1180 & DEV_0592
- SD RICOH SD / MM Card driver PCI VEN_1180 & DEV_0843
8. SFEP Sony Firmware Extension Parser Device Driver with a sly name ID SNY5001 ( 32 and 64bit). This will require manual review all of the devices ( known and unknown ) in the " Device Manager " with the name of the ID equipment. Perhaps it will take a lot of time ! But its very important to do without these drivers will not work button! How to see the device ID of equipment in the " Device Manager " , right- click the properties in the dialog box , select the tab " Information" in the properties window , select " ID equipment " and see if our driver called SNY5001, then go ahead and install the driver downloaded from the Internet if another name for ID equipment , then we do nothing , we close and continue to seek further.
- Sony Firmware Extension Parser Device Driver 8.0.1.2
8.1. SPIC Sony Programmable I / O Control his ID SNY601. Installation is similar to Sny5001
9. Touchpad there usually is not any problems during installation.
Alps Pointing-device Driver
10 . Wi-Fi
Intel (R) PRO / Wireless 2915ABG Network Connection Adapter
PCI VEN_8086 & DEV_4220 & SUBSYS_27018086
10.1 Modem Rockwell Semiconductor Systems
HDAUDIO FUNC_02 & VEN_14F1 & DEV_2BFA & SUBSYS_104D0200
11. WEB camera . Manual Installation is similar to claim 8 (Sny5001)
- Sony Visual Communication Camera VGP-VCC7 R5U870
12 fingerprint reader . Manual Installation is similar to claim 8 (Sny5001)
TcUsb.Dev, USB VID_0483 & PID_2015
Only after the successful installation of all drivers turn to install these tools in a strict sequence :
13. Sony Shared Library and restart your computer !
- Sony Shared Library 5.7.0.06070
14. VAIO Event Service
15. Set the Setting Utility Series and restart your computer !
16 VAIO Control Center
17 VAIO Power Management
18. VAIO Smart Network of your choice
If you like this article has helped you can thank the authors purse WebMoney Z276373925574
If you for some reason it does not work or you are the unwilling to spend their time - please contact us for help . Myproizvodim complete customization , installation and solve any problems notebooks Sony VAIO.
Anofriev Gregory Dnepropetrovsk
E-mail: grisha.anofriev@gmail.com
Tags : SONY VAIO, VGN-TZ121, VGN-TZ13, VGN-TZ130N / B, VGN-TZ131, VGN-TZ132 / N, VGN-TZ132N, VGN-TZ150N / B, VGN-TZ150N / N, VGN-TZ160CB VGN- TZ160N / B, VGN TZ16GN / B VGN-TZ16N, VGN-TZ16N / B, VGN-TZ17 / N, VGN-TZ170N / B, VGN-TZ170N / N, VGN-TZ17GN / B VGN-TZ17N, VGN-TZ18 / N , VGN-TZ185N/WC, VGN-TZ18GN / X, VGN-TZ18N, VGN-TZ190N / B GN-TZ191N/XC, VGN-TZ195N/XC VGN-TZ27 / N, VGN-TZ27N, VGN-TZ28 / N, VGN -TZ28N, VGN-TZ33 / B, VGN-TZ33 / N, VGN-TZ33 / W, VGN-TZ37N / G, VGN-TZ37N / P VGN-TZ37N / R, VGN-TZ37N / X GN-TZ38N / X, VGN -TZ50B, VGN-TZ90HS, VGN-TZ90NS, VGN-TZ90S, VGN-TZ10MN/N ,VGN-TZ10XN/B, VGN-TZ11MN/N, VGN-TZ11VN/X ,VGN-TZ11XN/B ,VGN-TZ12MN/N ,VGN-TZ12VN/X ,VGN-TZ1RMN/N ,VGN-TZ1RXN/B ,VGN-TZ20MN/N ,VGN-TZ20WN/B ,VGN-TZ21MN/N ,VGN-TZ21VN/R ,VGN-TZ21VN/X ,VGN-TZ21WN/B ,VGN-TZ21XN/B ,VGN-TZ22MN/N ,VGN-TZ22VN/X ,VGN-TZ2AWN/B, VGN-TZ2RMN/N ,VGN-TZ2RXN/B ,VGN-TZ31MN/N ,VGN-TZ31MN/P ,VGN-TZ31MN/W ,TZ31VN/R ,VGN-TZ31VN/X ,VGN-TZ31WN/B ,VGN-TZ31XN/B ,VGN-TZ32VN/X ,VGN-TZ3AWN/B, VGN-TZ3RMN/N ,VGN-TZ3RXN/B
And all the other parameters of the laptop, for example, the configuration or ergonomics, formed from the point of view of preservation of minimal size and weight.
Sony VAIO VGN-TZ ALL DRIVERS For WINDOWS 7 WINDOWS 8:
Link 1: Download Letitbit.net
Link 2: Download Turbobit.net
Warning if the link broken or not working , you can write to me about it and I will try to solve this problem.
Warning if the link broken or not working , you can write to me about it and I will try to solve this problem.
Support my group on Facebook.com or Twitter join us! Thank you in advance for your support and that you have chosen my blog.
For the most part these notebooks are short-lived work " on his knees " or a brief work " at a party " - the negotiations , etc.Iron:
Platform Intel Centrino Duo, Chipset Mobile Intel 945PM Express
The Intel Core 2 Duo U7500 (TZ2RMN / N) with a clock speed of 1.06 GHz or Intel Core 2 Duo U7600 processor with a clock speed of 1.2 GHz, FSB 533 MHz and 2048 KB L2 cache
Memory 1024 MB DDR-II 667 Nanya (TZ2RMN / N) , expandable to 2 GB.
Graphics Intel Graphics Media Accelerator 950 c 256 MB
HDD Toshiba MK1011 GAH volume of 100 GB, Interface Ultra 4200 rev / min
media :
Matshita DVD-RAM UJ-852S multi-format , buffer size 2MB , USB interface
Display LCD X-black LED technology Diagonal Size (inches ) - 11.1 , format resolution - 1366x768
Audio Realtek ALC262 @ Intel 82801GBM ICH7-M - High Definition Audio Controller,
A slot for memory cards such as Memory Stick Duo, Memory Stick PRO Duo and SD
WEB 0.3 megapixel camera . 320x240
interfaces :
Wi-Fi (WLAN 802.11b / g), Built-in Bluetooth ( Version ) 2.0 + EDR
Network Ethernet 10Base-T/100Base-TX/1000Base-T
4 Pin i.LINK (IEEE1394), Express card 34mm , 2x USB 2.0, VGA, RJ- 11, RJ- 45
Features:
The fingerprint scanner
Protect your hard drive shock G-sensor electronic protection HDD shock
Dimensions in mm 277h198 , 2x22 ,5 -29 , 8
Weight 1.19
You should know that you need to be patient and spend a lot of time for driver installation and configuration of this laptop ! To successfully install and guaranteed work Fn buttons and getting the maximum duration of the work required to comply with strict sequence of installing the drivers and utilities are already noticeable .
I warn you in advance that when it went on sale a laptop on board stood OS Windows VISTA. In principle drivers for Windows Vista compatible at 90 % with the operating system Windows 7.
1. Motherboard - Driver motherboard.
- Intel PCI IDE Controller
2 . Audio driver audikarty .
- Realtek High Definition Audio Driver
3 . Sony HDD Protection Filter Driver driver hard disk controller .
- Sony HDD Protection Filter Driver
4 . VIDEO Intel Graphics Media Accelerator 950 video card driver .
PCI VEN_8086 & DEV_27A2 & SUBSYS_8215104D
5 . Bluetooth driver bluetooth.
- Broadcom Bluetooth L2CAP Driver Installation
% BTWL2CAP.DeviceDesc% = BTWL2CAPST, BTHENUM {6E0C8F4C-D928- 4852 -B6B2-F0F0E0D126FA}
6. LAN Network Card
- Ethernet Marvell Yukon Ethernet Controller
PCI VEN_1148 & DEV_4320 & SUBSYS_29161259
PCI VEN_1148 & DEV_9E00 & SUBSYS_92001148
7. Card Reader card reader standard Memory Stick and SD. Potrebudetsya manual installation via Device Manager .
- MS RICOH SD / MM Card and Memory Stick driver PCI VEN_1180 & DEV_0592
- SD RICOH SD / MM Card driver PCI VEN_1180 & DEV_0843
8. SFEP Sony Firmware Extension Parser Device Driver with a sly name ID SNY5001 ( 32 and 64bit). This will require manual review all of the devices ( known and unknown ) in the " Device Manager " with the name of the ID equipment. Perhaps it will take a lot of time ! But its very important to do without these drivers will not work button! How to see the device ID of equipment in the " Device Manager " , right- click the properties in the dialog box , select the tab " Information" in the properties window , select " ID equipment " and see if our driver called SNY5001, then go ahead and install the driver downloaded from the Internet if another name for ID equipment , then we do nothing , we close and continue to seek further.
- Sony Firmware Extension Parser Device Driver 8.0.1.2
8.1. SPIC Sony Programmable I / O Control his ID SNY601. Installation is similar to Sny5001
9. Touchpad there usually is not any problems during installation.
Alps Pointing-device Driver
10 . Wi-Fi
Intel (R) PRO / Wireless 2915ABG Network Connection Adapter
PCI VEN_8086 & DEV_4220 & SUBSYS_27018086
10.1 Modem Rockwell Semiconductor Systems
HDAUDIO FUNC_02 & VEN_14F1 & DEV_2BFA & SUBSYS_104D0200
11. WEB camera . Manual Installation is similar to claim 8 (Sny5001)
- Sony Visual Communication Camera VGP-VCC7 R5U870
12 fingerprint reader . Manual Installation is similar to claim 8 (Sny5001)
TcUsb.Dev, USB VID_0483 & PID_2015
Only after the successful installation of all drivers turn to install these tools in a strict sequence :
13. Sony Shared Library and restart your computer !
- Sony Shared Library 5.7.0.06070
14. VAIO Event Service
15. Set the Setting Utility Series and restart your computer !
16 VAIO Control Center
17 VAIO Power Management
18. VAIO Smart Network of your choice
If you like this article has helped you can thank the authors purse WebMoney Z276373925574
If you for some reason it does not work or you are the unwilling to spend their time - please contact us for help . Myproizvodim complete customization , installation and solve any problems notebooks Sony VAIO.
Anofriev Gregory Dnepropetrovsk
E-mail: grisha.anofriev@gmail.com
Tags : SONY VAIO, VGN-TZ121, VGN-TZ13, VGN-TZ130N / B, VGN-TZ131, VGN-TZ132 / N, VGN-TZ132N, VGN-TZ150N / B, VGN-TZ150N / N, VGN-TZ160CB VGN- TZ160N / B, VGN TZ16GN / B VGN-TZ16N, VGN-TZ16N / B, VGN-TZ17 / N, VGN-TZ170N / B, VGN-TZ170N / N, VGN-TZ17GN / B VGN-TZ17N, VGN-TZ18 / N , VGN-TZ185N/WC, VGN-TZ18GN / X, VGN-TZ18N, VGN-TZ190N / B GN-TZ191N/XC, VGN-TZ195N/XC VGN-TZ27 / N, VGN-TZ27N, VGN-TZ28 / N, VGN -TZ28N, VGN-TZ33 / B, VGN-TZ33 / N, VGN-TZ33 / W, VGN-TZ37N / G, VGN-TZ37N / P VGN-TZ37N / R, VGN-TZ37N / X GN-TZ38N / X, VGN -TZ50B, VGN-TZ90HS, VGN-TZ90NS, VGN-TZ90S, VGN-TZ10MN/N ,VGN-TZ10XN/B, VGN-TZ11MN/N, VGN-TZ11VN/X ,VGN-TZ11XN/B ,VGN-TZ12MN/N ,VGN-TZ12VN/X ,VGN-TZ1RMN/N ,VGN-TZ1RXN/B ,VGN-TZ20MN/N ,VGN-TZ20WN/B ,VGN-TZ21MN/N ,VGN-TZ21VN/R ,VGN-TZ21VN/X ,VGN-TZ21WN/B ,VGN-TZ21XN/B ,VGN-TZ22MN/N ,VGN-TZ22VN/X ,VGN-TZ2AWN/B, VGN-TZ2RMN/N ,VGN-TZ2RXN/B ,VGN-TZ31MN/N ,VGN-TZ31MN/P ,VGN-TZ31MN/W ,TZ31VN/R ,VGN-TZ31VN/X ,VGN-TZ31WN/B ,VGN-TZ31XN/B ,VGN-TZ32VN/X ,VGN-TZ3AWN/B, VGN-TZ3RMN/N ,VGN-TZ3RXN/B
Available link for download
How To Disable Night Mode In Windows 10
How To Disable Night Mode In Windows 10

My last article was to enable night mode in Windows 10 and now today here Im writing to disable it. Hope, youve tried this secret feature of night mode in Windows 10. If didnt yet then visit there my previous article How To Enable Night Mode In Windows 10?. In which, I totally discussed about night mode in Windows 10 and shared a procedure to enable it. But if youve tried already and wanna disable it then heres how can you do it.
Yesterday, I received an email. In which, a fan of our blog was asking to disable this feature. So, I felt that its also necessary to share procedure to disable it. So, if youre also that user who wanna disable this feature then follow below. A complete procedure is explained to disable night mode feature in Windows 10.
Read More: How To Enable Night Mode In Windows 10?
How To Disable Night Mode In Windows 10?
To disable night mode feature, you have to edit two registry keys. To edit first key, first open the Run by pressing Window + R and typeRegedit and press the Enter.
After to do that, now Registry edit will be opened. Here navigate the following keys.
HKEY_LOCAL_MACHINESOFTWAREMicrosoftWindowsCurrentVersionThemesPersonalize

Once you navigate then click on Personalize and find a key AppsUseLightTheme at right pane. When you got at once then right click on it and then delete.

Read More: How To Disable Action Center In Windows 10?
Your first registry key has been edited and now you need to require second key. To edit it, again open Run by pressing Window + R and type
regedit here and press the Enter.Navigate the following keys like above.
HKEY_CURRENT_USERSOFTWAREMicrosoftWindowsCurrentVersionThemespersonalize

Now click on Personalize and find a key thats named AppsUseLightTheme. When you found then right click on it and then delete it. Thats it!

Read More: Tips To Disable And Configure Automatic Updates In Windows 10
Last Words
So this is what that I shared after a request from our visitor. Dark mode is a hidden feature of Windows 10 thats not officially provided by Microsoft. But we can enable it own. But remember by enabling dark mode, there isnt a big difference, you will see. Its workable for a specific folders and menus like control panel etc etc. So, try it, I mean enable it at once by following the steps in this article How To Enable Night Mode In Windows 10?. After try it, if ever want to disable it, then follow the above steps.Give your views about it through comment section below and dont forget to share it with other Windows 10 users.
Available link for download
Customize a boot image that uses Windows PE 4 or Windows PE 10
Customize a boot image that uses Windows PE 4 or Windows PE 10
Use of DISM and WMI to customize an existant Windows PE 10
- Copy the boot image (wimpe.wim) from the Windows AIK installation folder (for example, <InstallationPath>Windows AIKToolsPEToolsamd64) to a folder on the computer from which you will customize the boot image. This procedure uses C:WinPEWAIK as the folder name. ( If you have alerady create your own WIM by following this tutorial you can use them without copying WIM of step 1)
- Use DISM to mount the boot image to a local Windows PE folder. For example, type the following command-line:dism.exe /mount-wim /wimfile:C:WinPEWAIKwinpe.wim /index:1 /mountdir:C:WinPEMountWhere C:WinPEWAIK is the folder that contains the boot image and C:WinPEMount is the mounted folder.
 NoteFor more information about DISM, see the Deployment Image Servicing and Management Technical Reference topic in the Windows 7 TechNet Documentation Library.
 - After you mount the boot image, use DISM to add optional components to the boot image. In Windows PE 3.1, for example, the optional components are located in <InstallationPath>Windows AIKToolsPEToolsamd64WinPE_FPs.NoteThis procedure uses the following location for the optional components: C:Program FilesWindows AIKToolsPEToolsamd64WinPE_FPs. The path you use might be different depending on the version and installation options you choose for the Windows AIK.Type the following to install the optional components:dism.exe /image:C:WinPEMount /add-package /packagepath:"C:Program FilesWindows AIKToolsPEToolsamd64WinPE_FPswinpe-wmi.cab"dism.exe /image:C:WinPEMount /add-package /packagepath:"C:Program FilesWindows AIKToolsPEToolsamd64WinPE_FPswinpe-scripting.cab"dism.exe /image:C:WinPEMount /add-package /packagepath:"C:Program FilesWindows AIKToolsPEToolsamd64WinPE_FPswinpe-wds-tools.cab"dism.exe /image:C:WinPEMount /add-package /packagepath:"C:Program FilesWindows AIKToolsPEToolsamd64WinPE_FPs<locale>winpe-wmi_<locale>.cab"dism.exe /image:C:WinPEMount /add-package /packagepath:"C:Program FilesWindows AIKToolsPEToolsamd64WinPE_FPs<locale>winpe-scripting_<locale>.cab"dism.exe /image:C:WinPEMount /add-package /packagepath:"C:Program FilesWindows AIKToolsPEToolsamd64WinPE_FPs<locale>winpe-wds-tools_<locale>.cab"Where C:WinPEMount is the mounted folder and locale is the locale for the components. For example, for the en-us locale, you would type:dism.exe /image:C:WinPEMount /add-package /packagepath:"C:Program FilesWindows AIKToolsPEToolsamd64WinPE_FPsen-uswinpe-wmi_en-us.cab"dism.exe /image:C:WinPEMount /add-package /packagepath:"C:Program FilesWindows AIKToolsPEToolsamd64WinPE_FPs en-uswinpe-scripting_en-us.cab"dism.exe /image:C:WinPEMount /add-package /packagepath:"C:Program FilesWindows AIKToolsPEToolsamd64WinPE_FPs en-uswinpe-wds-tools_en-us.cab"
 TipFor more information about the different packages that you can add to the boot image, see the Add a Package to a Windows PE Image topic in the Windows 7 TechNet Documentation Library.
 - Use DISM to add specific drivers to the boot image, when required. Type the following to add drivers to the boot image, if required:dism.exe /image:C:WinPEMount /add-driver /driver:<path to driver .inf file>Where C:WinPEMount is the mounted folder.
- Type the following to unmount the boot image file and commit the changes.dism.exe /unmount-wim /mountdir:C:WinPEMount /commitWhere C:WinPEMount is the mounted folder.
- Add the updated boot image to Configuration Manager to make it available to use in your task sequences. Use the following steps to import the updated boot image:
- In the Configuration Manager console, click Software Library.
- In the Software Library workspace, expand Operating Systems, and then click Boot Images.
- On the Home tab, in the Create group, click Add Boot Image to start the Add Boot Image Wizard.
- On the Data Source page, specify the following options, and then click Next.
- In the Path box, specify the path to the updated boot image file. The specified path must be a valid network path in the UNC format. For example: <servername><WinPEWAIK share>winpe.wim.
- Select the boot image from the Boot Image drop-down list. If the WIM file contains multiple boot images, each image is listed.
- On the General page, specify the following options, and then click Next.
- In the Name box, specify a unique name for the boot image.
- In the Version box, specify a version number for the boot image.
- In the Comment box, specify a brief description of how the boot image is used.
- Complete the wizard.
- You can enable a command shell in the boot image to debug and troubleshoot it in Windows PE. Use the following steps to enable the command shell.
- In the Configuration Manager console, click Software Library.
- In the Software Library workspace, expand Operating Systems, and then click Boot Images.
- Find the new boot image in the list and identify the package ID for the image. You can find the package ID in the Image ID column for the boot image.
- From a command prompt, type wbemtest to open the Windows Management Instrumentation Tester.
- Type <SMS Provider Computer> ootsmssite_<sitecode> in Namespace, and then click Connect.
- Click Open Instance, type sms_bootimagepackage.packageID="<packageID>", and then click OK. For packageID, enter the value that you identified in step 3.
- Click Refresh Object, and then click EnableLabShell in the Properties pane.
- Click Edit Property, change the value to TRUE, and click Save Property.
- Click Save Object, and then exit the Windows Management Instrumentation Tester.
- You must distribute the boot image to distribution points, distribution point groups, or to collections that are associated with distribution point groups before you can use the boot image in a task sequence. Use the following steps to distribute the boot image.
- In the Configuration Manager console, click Software Library.
- In the Software Library workspace, expand Operating Systems, and then click Boot Images.
- Click the boot image identified in step 3.
- On the Home tab, in the Deployment group, click Update Distribution Points.
Available link for download
Subscribe to:
Comments (Atom)